Are you looking for an introduction to your article about image stabilization? If so, then you have come to the right place!
Capturing beautiful photographs requires skill and knowledge of photography, but unfortunately, sometimes even the most experienced photographer can experience shaky images.
Image stabilization helps to reduce blur caused by camera shake.
In this article, we will explore the basics of image stabilization, how it works, the different types of image stabilization, and when it might not be the best choice.
By understanding these fundamentals, you’ll be able to capture stunning photos without the worry of blurry images.
Let’s dive in!
What is image stabilization
Image stabilization is a system that helps your digital cameras, lens, or other imaging devices to reduce blurring due to vibration and other camera movements during exposure.
This feature allows for sharper, more consistent images or footage by counteracting the effects of unexpected hand movements or shakes.
Image stabilization is essential when you are handholding a camera and unable to achieve a fast shutter speed.
Without image stabilization, the chances of camera movement (shake) making the image blurry increases greatly. Image stabilization helps to reduce this motion blur, providing a sharper image and increased clarity.
Different manufacturers have different names for this technology:
- Canon: Image Stabilization (IS)
- Nikon: Vibration Reduction (VR)
- Sony: Optical Steady Shot (OSS) & Mega Optical Image Stabilization (Mega OIS)
- FujiFilm: Optical Image Stabilization (OIS)
- Panasonic: Power Optical Image Stabilization (Power OIS) & Dual Image Stabilization (Dual IS)
- Olympus: Image Stabilization (IS)
- Sigma: Optical Stabilization (OS)
- Tamron: Vibration Control (VC)
You can check the specifications of your camera model to see if it has image stabilization capabilities. Most newer digital and video cameras will have some form of image stabilization built-in. These letter abbreviations of image stabilizations are typically stamped onto the lenses.
How do Image Stabilization Systems Work?
Image stabilization is a feature used to reduce blur in photographs or videos. It typically works by two methods: lens-based stabilization or camera body-based stabilization.
Through these methods, image stabilization is able to reduce unwanted movement and blur so that you have a better chance of getting a clear shot.
Let’s take a closer look at these differences so that we can maximize the potential of each one.
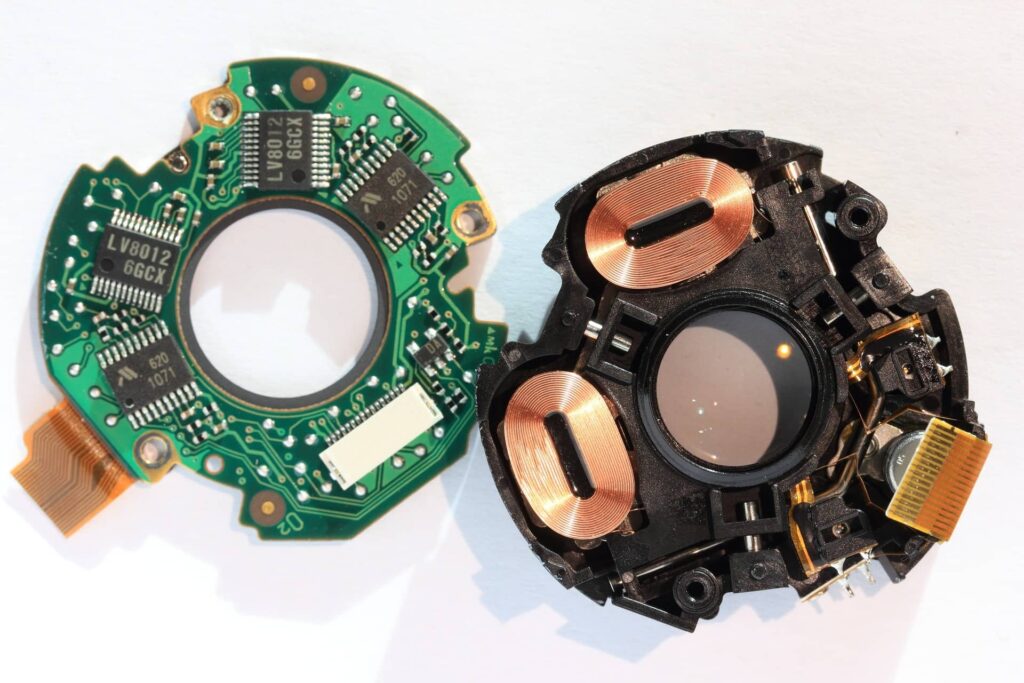
In-Lens Stabilization
In-lens stabilization uses a floating lens element surrounded by several different gyros, which is controlled by a sensor to compensate for movements in the opposite direction.
Getting a steadier shot can be difficult, especially when using longer telephoto zoom lenses.
Investing in a lens with image stabilization features is highly recommended if you use telephoto lenses a lot, as it will help reduce the effects of small movements and improve the overall quality of your shots. This can be costly, but the results are well worth it.
Some camera brands have developed different modes to help us get the best of the stabilization system in different situations.
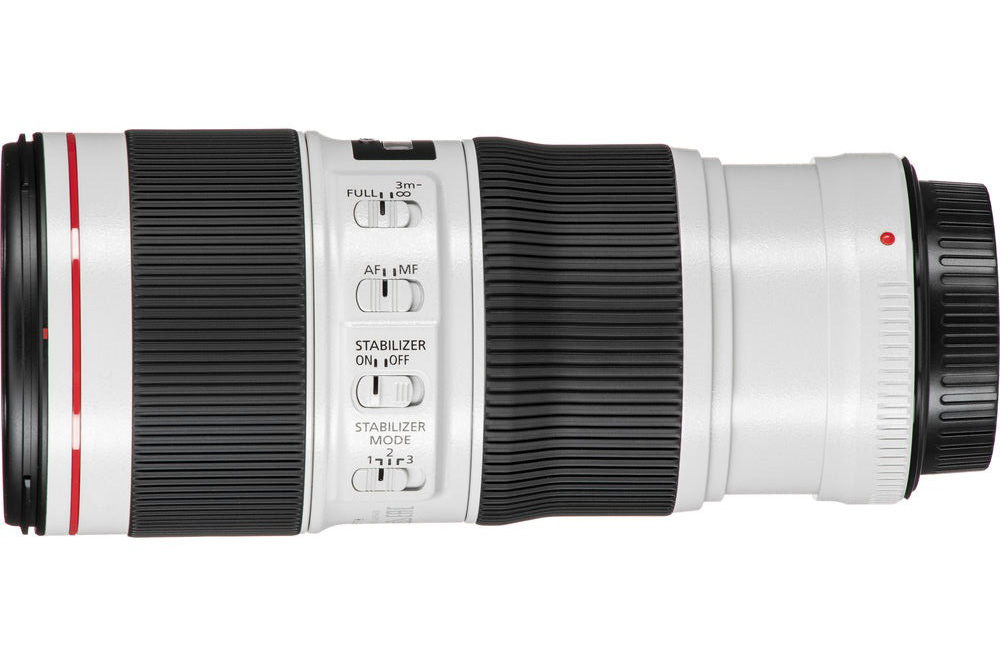
For example, Canon has 3 modes in some lenses.
Mode 1 is the normal stabilization mode that corrects for lens vibrations in all directions. This mode is best used when taking a photo of a stationary subject, helping to reduce camera shake and provide sharper images at slower shutter speeds.
Mode 2 is the panning stabilization mode that helps to reduce camera shake when following a moving subject. This mode works best when the photographer can pan their camera in the same direction as the movement of the subject.
For example, when photographing a bird in flight, the photographer can pan their camera with the bird and use Mode 2 of image stabilization to reduce camera shake caused by any vertical or horizontal camera movement.
Mode 3 helps to reduce camera shake by using lens and body movements to compensate for any camera movement. This mode can be helpful for tracking fast-moving subjects, as it provides an unaffected view of the subject in real-time without any smoothing effect.
However, some photographers may prefer Mode 1 or Mode 2 when photographing a moving subject, as these modes provide better stability and sharper images.
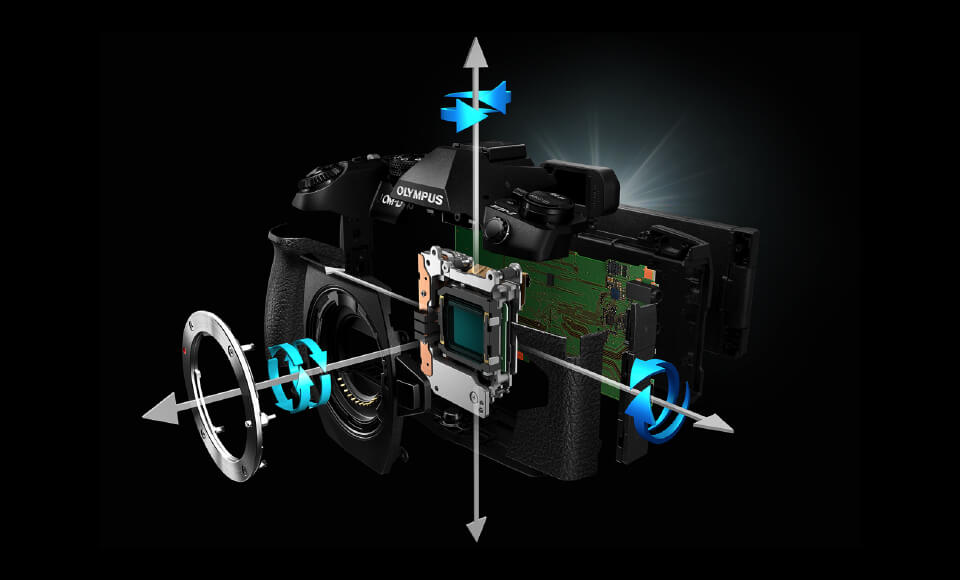
In-Camera Stabilization
In-camera stabilization is also known as In-Body Image Stabilization (IBIS).
Similar to In-lens stabilization which uses a floating lens element, IBIS uses a floating sensor in the camera body to counteract the movement.
But unlike lens-based image stabilization, which only applies to specific lenses, the main advantage of IBIS is that, once activated, it provides stabilization for all lenses used with the camera.
The technology of in-camera stabilization was developed later than lens stabilization, and is more commonly found in mirrorless cameras produced after 2020.
Which one is better?
Both of these systems offer different benefits.
It is important to decide which system to use to make the most out of both types of stabilization.
Optically-stabilized lenses can be fine-tuned based on specific lens features like size, weight, and focal length, making it more effective than generic in-camera stabilization.
This makes it particularly ideal for telephoto lenses, as it can maximize the counteracting effect.
Additionally, in-lens stabilization can produce better results in low light conditions, which often cause issues with in-body image stabilization. And, since in-lens stabilization uses smaller motors and requires less energy, it can offer longer battery life than in-body image stabilization.
On the other hand, In-camera image stabilization is a great way to get the most out of your camera and lenses. It works with all types of lenses; you can even use it with old and third-party lenses which do not have in-lens stabilization.
Plus, since it’s part of the camera body, you only have to pay for it once and won’t need to upgrade all of your lenses if a new and improved IS system is available.
Additionally, since the light does not pass through an image stabilization mechanism, there’s no resulting change to the lens bokeh and no annoying high-pitched sounds from the lens as it focuses – great news for recording videos without an external microphone.
What’s more, these two different systems can work together for better results, depending on your camera system.
For example, Canon’s IBIS works seamlessly with the optical image stabilization inside the lens, providing up to 8 stops of shake correction for certain camera and lens combinations.
Despite all the advantages image stabilization has, there is one common misconception: it can “freeze” fast-moving objects at slower shutter speeds.
This is not the case – image stabilization is designed to reduce camera shake only and cannot help to prevent blur from moving subjects.
Let’s discuss when to turn it off to avoid misusing it, leading to blurry images.
When to turn off image stabilization
Image stabilization is a fantastic feature that can help you take sharper images even at slower shutter speeds. However, it is important to know when to turn it off – as there are certainly times when doing so will result in better photos!
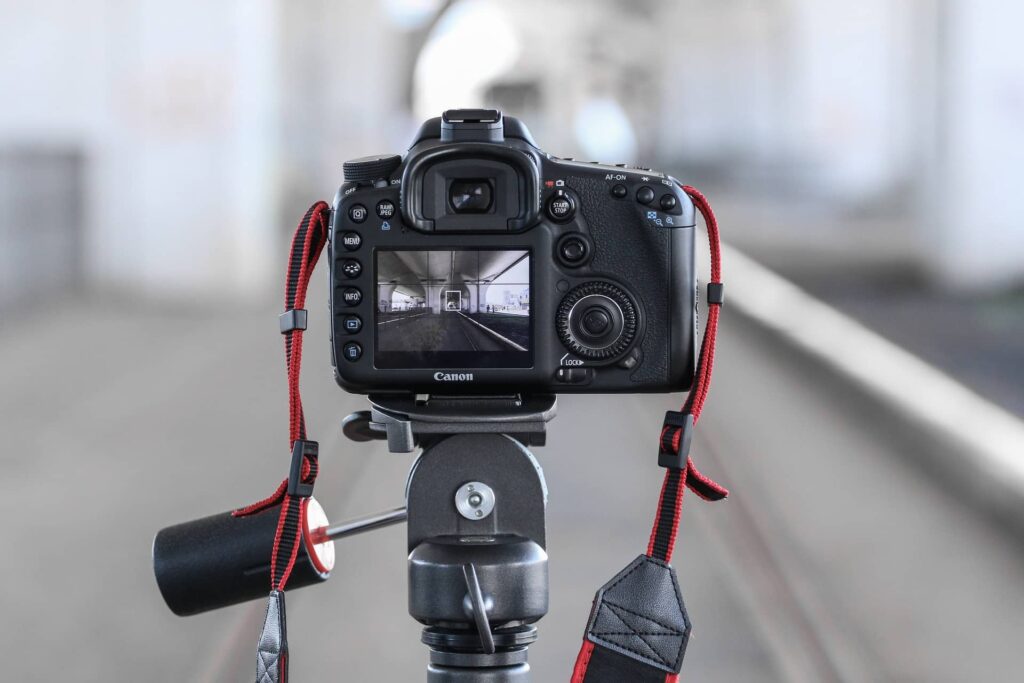
When you are using your camera on a tripod
When using a camera on a tripod, it is important to turn off the image stabilization function to prevent vibration from being introduced into the frame.
The image stabilization system is designed to detect even the slightest movements, which can create a feedback loop when using a tripod. Turning off the image stabilization will allow your tripod to do the work and keep the image steady. This can help to reduce blur in the final image.
When you are traveling
The floating lens element used to counteract the camera shake is still active when you are traveling if you leave the stabilization on. This could cause damage to the lens if it is subjected to sudden, violent motion. Although the technology is constantly improving, some old systems still need to be smart or strong enough to keep the lens steady. I recommend you turn it off and wait for a while before dismounting the lens.
When your battery is draining
Image stabilization consumes more battery power than regular shooting, so it is recommended to turn off image stabilization when the battery is running low in order to conserve energy.
I also noticed that the bigger the sensor or the lens is, the more energy the image stabilization consumes.
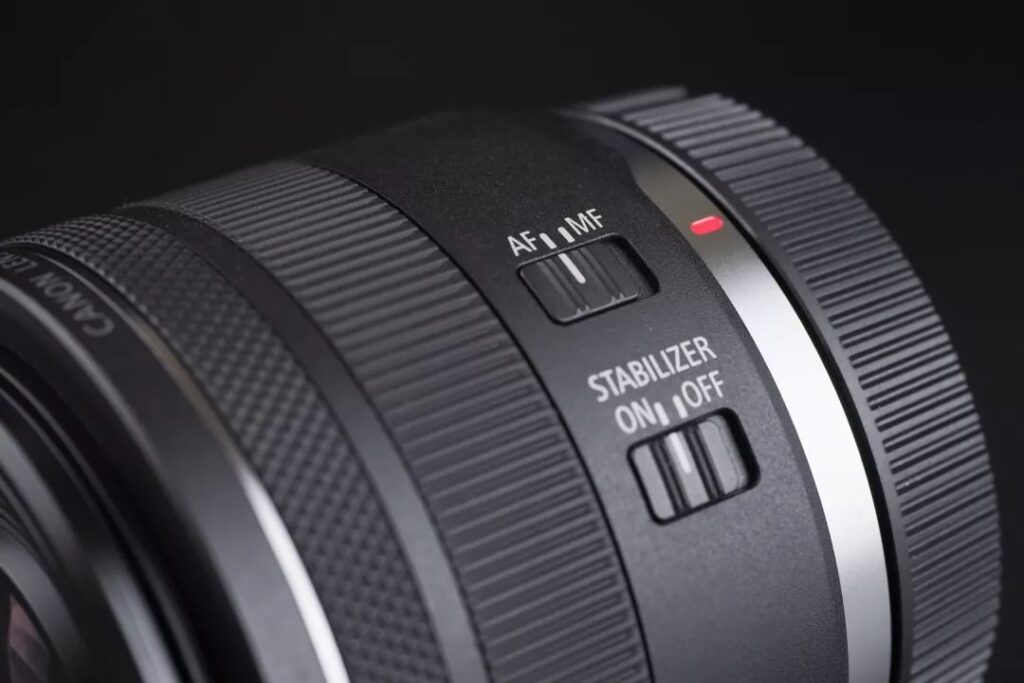
It is straightforward to turn off the image stabilization when needed.
For in-camera stabilization, you can find the option in the menu system. And you can turn off the in-lens stabilization with the push of the dedicated button.
When image stabilization does not help
We’ll discuss the cases when image stabilization won’t help, so you know how to get a crystal clear image every time!
Blur Caused by Inaccurate Focus
If your image is not sharp because of improper focus, the image stabilization won’t help because it is the job of your camera’s focusing system.
When shooting photographs, it’s important to focus accurately on your subject. This can be tricky, especially if you are shooting an action photo or a photo with a stationary subject.
Always choose the focus point yourself to get the best results – don’t let the camera decide.
For portraits, focus specifically on the eye of the person closest to the camera, and for landscapes, focus one-third up from the bottom of the frame.
Additionally, ensure that you are not focusing too close to the lens or swaying forward or backward, as this can result in blurred images.
By using these tips and practicing, you will soon become an expert at accurate focusing in photography!

Blur Caused by Motion of Your Subject
Image stabilization is designed to compensate for the movement of the camera or lens, not the subject. It only allows you to shoot static objects at a slower shutter speed. If you shoot a moving subject at a shutter speed that is not fast enough to freeze the motion, you will get what’s so called “motion blur”.
So what shutter speed should you use? There is a standard rule of thumb in photography called “reciprocal rule”: The shutter speed should be inversely proportional to the equivalent focal length or faster.
In case you do not know the equivalent focal length, you can check my another article “Unlocking The Secrets Of Focal Length“.
Capturing a perfect shot with your full-frame 200mm lens? Make sure to use 1/200 second or faster shutter speed to prevent any unwanted blur from camera shake, and create a still image that is sure to wow!
However, the ideal shutter speed is also heavily dependent on the subject of the photograph.
If you are shooting wind-blown grass in the foreground, use a slower shutter speed to capture the dynamic movement of the blades, or a faster shutter speed to freeze the motion in place and make the photo stand out!
No matter what setting you choose, practice and experiment with different shutter speeds to ensure you get the right shot every time.

FAQs about image stabilization
Do you need image stabilization for sports photography?
It depends. Image stabilization is not very important in sports photography. If enough light enters the sensor and a shutter speed is high enough to reduce visible shake, then image stabilization becomes redundant.
However, image stabilization can offer a bonus if there is not enough light. Still, since it cannot fix the unpredictable movement of sports shots in low light levels, turning the image stabilization off may be more beneficial.
Do prime lenses have image stabilization?
Yes. According to the search results from NeoCamera, there are currently 99 prime lenses, which makes sense because image stabilization helps reduce blur caused by camera shake – which is often a concern when using telephoto lenses, regardless of whether they are zoom or prime.
Actually, wide-angle lenses don’t generally require as slow a shutter speed, making image stabilization less necessary.
Do you need image stabilization in a mirrorless camera?
Yes. Camera shake can occur regardless of whether you use a mirrorless or DSLR camera.
However, image stabilization is more commonly found in mirrorless cameras due to the relatively recent combination of the two technologies. Furthermore, mirrorless cameras do not require the additional space taken up by the mirror, allowing for more remarkable development in the area of image stabilization.
Final Words
After reading this article, you now better understand image stabilization and how it can help you capture beautiful photographs.
Although it can be complicated to master, with a bit of practice, you’ll be able to take advantage of the many benefits that image stabilization offers.
With a few simple steps and the proper techniques, you can create incredible photography that you can be proud of!
")


")

